RO Tanks & Tank Valves
Water Flow
-
A reverse osmosis tank is simply a miniature well tank. Pressure tanks on wells and RO tanks work the same way.
-
Water enters and leaves the tank through the same tube.
Does Water Come Into Contact with the Plastic/Metal Shell?
-
Inside the tank is a bladder made of a material called butyl. Water does not touch the metal or plastic shell of the tank. It touches only the butyl bladder and spout (usually stainless steel or hard plastic) as it enters or leaves the tank.
Air Pressure and Reverse Osmosis Tanks
-
There is a small air charge between the outside of the bladder and the inside of the tank. It's the air pressure that pushes the water out of the tank when you open the faucet.
-
When you purchase an RO unit or a new tank, the tank is usually pre-charged with air. But tanks are like automobile tires: you have to put air in them as part of normal maintenance.
-
The air valve to check the pressure is located on the side or on the bottom of most RO tanks. It has a cap like an auto tire air cap.
-
The standard air charge for undersink RO tanks is about seven psi when there is no water in the tank. You have to empty the tank of water in order to check the air pressure.
-
To check the pressure accurately, you need a low pressure air gauge. You can find these at auto parts stores or hardware stores.
-
To add air to the tank you need a high tech tool called a bicycle pump. These are also available at hardware stores.
-
Putting too much air in the tank will not give you more pressure at the faucet; it will just give you less water in the tank.
Servicing Reverse Osmosis Tanks
-
To add air to the tank, turn off the inlet water to the unit, open the ledge faucet and let all the water run out of the tank. The valve on the tank must be open. When the tank is empty, attach a bicycle pump to the air valve on the tank and slowly pump in air. Water should come out of the faucet. Pump until no more water comes out, then check the pressure with a low pressure tire gauge. Leave about 7 psi in the tank when no water is in it.
RO tanks are interchangeable. You don't have to replace the tank on your RO unit with one of the same brand or same size.
-
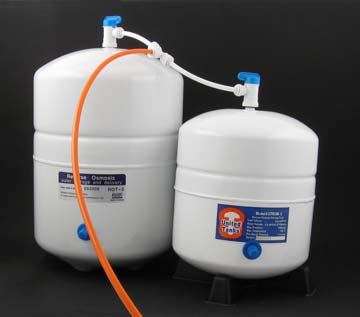
If you want more capacity, it's usually easier and more economical to use two (or more) standard-sized tanks rather than a large tank. To join two tanks, all you need is a single tee and some tubing. The orange tube in the picture connects the tanks to the RO unit. The tanks don't need to be the same size or the same style. They will interact perfectly together.

Tank Capacity
-
Some of the tank's inner capacity is taken up by air and part is taken up by the bladder. Therefore, for practical purposes, the stated volume in gallons of the tank is about twice what the tank will actually hold in terms of usable water. You'll get about two gallons of usable water from a four gallon tank. This will vary according to your inlet water pressure, the temperature of the water, the condition of the membrane and prefilter of your RO unit, and a few other variables. But don't expect four gallons of water from a four gallon tank. On the other hand, two gallons is a lot of water unless you're filling an aquarium or hosting a dinner party for 18.
Metal or Plastic?
-
Metal tanks and plastic tanks yield water of equal quality. Plastic tanks are heavier and cost more than metal tanks, as a rule. The main advantage of plastic tanks is that the do not rust. Normally, metal tanks don't rust if you keep them dry.
Tank Valves
-
A tank valve is an essential part of the RO unit, although many cheap RO units are built without a tank valve. Without a tank valve, it is necessary to empty the tank to do a minor repair on the RO unit. The valve allows you to isolate the tank from the rest of the RO unit. This is a great advantage when you perform routine maintenance or service on the RO unit.
Site Index
Filtration Systems
- Aeration for Iron & Sulfide
- Backwashing Filters
(whole house & well units)
- Chlorine & Chemical Injectors
- Countertop Water Filters
- Emergency Filters
- Garden Hose Filters
- Reverse Osmosis, Residential
- Reverse Osmosis, Commercial
- Shower Filters
- Specialty Filters
- Ultraviolet Systems
- Undersink Filters
- Water Softeners
- Whole House Filters
Cartridges
Parts
- Replacement Parts
- Faucets
- Filter Media
- Fittings
- Housings
- O-rings
- Pumps
- Pura UV
- R.O. Parts
- R.O. Tanks
- R.O. Booster Pump
- VIQUA UV