Installing the Black & White
Series Undersink Reverse Osmosis Unit

Thank you for purchasing our Black & White series Reverse Osmosis Unit. The unit is designed to be as easy to install as possible. The instructions are a little detailed because of the number of parts. Don't hesitate to call for advice if you get stuck. Before beginning, please take a moment to review the contents of the box to ensure that your unit is complete.
Often our Black & White units are custom built to your order, so don't be concerned if you have an extra part or two. Here is a list of what is essential:
- Reverse Osmosis Unit
- Pressurized Storage Tank & Tank Valve
- Inlet Installation Kit
- Drain Saddle Installation Kit
- Ledge Faucet & Installation Kit
- Handheld TDS Tester
- Additional Tubing
- RO Membrane (Installed)
- Pre & Post Filter Cartridges (Installed)
- Filter Housing Wrench
You will probably need most of the following tools & supplies to complete the installation.
- A set of open end wrenches and/or a couple of good crescent wrenches.
- Sharp scissors or clippers to cut tubing.
- Electric drill.
- Phillips screwdriver.
- Pliers.
Recommended Order of Installation
Here are the steps that must be completed to install your new RO unit. You don't have to follow this order, but it is probably easier if you do.
For each step, follow the instructions included with the associated kit.
-
Install the ledge faucet.
-
Establish a source of water for the RO unit by installing the inlet valve.
-
Install the drain saddle.
-
Install the tank valve on top of the storage tank. Just screw the valve down several turns onto the stem. No tool necessary, and don't overtighten. (The small capped valve on the side near the bottom of the tank is to add air at the time of the unit's annual service. Your tank has been pre-aired before shipment, so for now leave it alone.)
-
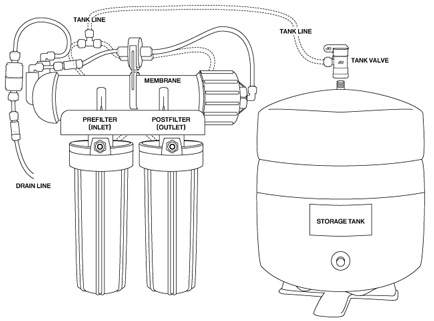
Setup the unit & tank. Place the storage tank and the RO unit where you want them under the sink. The unit can be wall mounted or simply stood in a secure location. Remember that you're going to have to service both the tank and the RO unit, so avoid making them inaccessible.
Connecting the Unit
Complete the installation by attaching the tank, inlet, drain and faucet tubing to your unit:
-
The inlet tube is attached to the front of the pre-filter housing.
-
The faucet tube is attached to the front of the post-filter housing.
-
The drain tube is attached to the drain saddle installed on your drain pipe.
-
The tank tube is attached to the tee fitting on the top of the unit.
Once these connections are made, the unit is installed.
Startup
When all connections are made, start the unit by the following procedure.
-
Open the ledge faucet and leave it open. Leave the tank valve open (blue handle parallel to the tubing).
-
Turn on the inlet valve and let water flow into the unit. Gurgling and hissing are normal.
-
Check for leaks.
-
After fifteen minutes or so, water will begin to drip from the open faucet and eventually level off to a small stream or fast drip. This is normal.
-
Allow water to drip from the faucet for about an hour to thoroughly rinse the membrane, then close the faucet. Water will now begin to collect in the storage tank.
-
Allow water to fill the tank for two or three hours, then open the faucet and let the tank empty. Again, gurgling, hissing, and spluttering are normal. When the faucet returns to the small stream or fast drip, the tank is empty. Close the faucet and let the unit collect water. You can now use the unit at any time (although you won't have a lot of water for a half hour or so).
Operation of the unit is fully automatic from this point. As you use water, the unit will turn on automatically and refill the tank.
Tip: Sometimes trapped air will cause cloudy water. This is not a health issue and it will soon go away.
After two or three days, it's a good idea to do a TDS test. Instructions are with the meter. (Testing the day the unit is installed will give a false, high reading.)
Maintenance
No maintenance should be needed for a year. When the unit is a year old, we'll send you a postcard reminder that it's time to change the carbon block pre & post filter cartridges.
Don't hesitate to use the water. Reverse Osmosis thrives on work. Don't hesitate to use it to cook spaghetti, and especially, give it to your pets and plants. They'll love it, and the unit will run all the better for the workout. If you have problems, please call right away. We want the unit to work perfectly for you, so let us know if it doesn't perform to your satisfaction. (Most of our business comes from referrals from satisfied customers, so we do our best to keep everything running well.)

Using Quick Connect Fittings
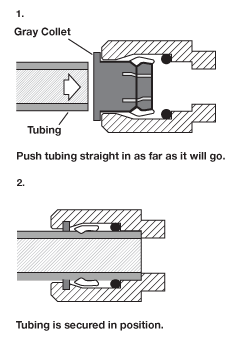
Quick connect fittings make an easy and extremely secure connection. They can be used on copper tubing, but work best on plastic.
Be sure the end of the tubing is cut square, then push in until you feel the tube hit bottom. Should you need to remove the tube, push in on the collet (the small plastic collar that encircles the tube) with your fingernail and pull the tube out simultaneously. If the unit has been in use, you will not be able to remove the tube from the fitting if water pressure has not been released. If you remove a tube and reinsert it, it's a good idea to trim off a small portion of the end of the tube to assure a leak-free reconnection.
Using Your TDS Tester
This is a simple but very reliable tester that measures the Total Dissolved Solids (TDS) in water. It gives a reading in parts per million (ppm) of all the dissolved solids, good or bad. Dissolved solids in water are mainly its mineral content. If your tap water, for example, has a TDS reading of 250 parts per million, that means that the total content of the minerals dissolved in the water make up 250 parts per million of the total volume.
For practical purposes, TDS measurement is a very effective way to test you reverse osmosis unit's performance.
To operate:
-
Remove the cover from the bottom of the tester, then turn on the unit by pressing the On/Off button. The display should read 000.
-
Insert the tip of the tester (the end where the cover was) into the water to be tested. A half inch or so deep is plenty. You'll ruin the meter if you submerge it too deeply.
-
Read the numbers on the display. The number you see is the TDS (Total Dissolved Solids) of the water expressed in PPM (parts per million).
-
The Hold button and the Temp button are features you probably won't need. Hold locks the number on the display so it won't go away and Temp measures the temperature of the water.
-
When you're finished, turn the tester off.
Note: The tester is factory calibrated. You won't need to calibrate it.
Testing your RO membrane:
Measure the TDS of your tap water, then measure the product water for comparison. The RO water should be about 1/10 or less the reading of the tap water. In other words, if the tap water reads 250, the reverse osmosis water should read around 25 or less. What you are measuring is the performance of the reverse osmosis membrane. As long as you get a respectable TDS reading, the membrane does not need to be replaced. Typically, reverse osmosis membranes last three years or longer.
Important: When testing your new unit, wait until it has run for a few days to ensure a reliable reading. It takes quite some time for the newness to wear off the system.
If you are servicing the unit, take your test before changing the carbon filters. New carbon filters will corrupt the reading considerably and read much too high. The meter can “see” the manufacturing residue from the carbon filters.
Site Index
Filtration Systems
- Aeration for Iron & Sulfide
- Backwashing Filters
(whole house & well units)
- Chlorine & Chemical Injectors
- Countertop Water Filters
- Emergency Filters
- Garden Hose Filters
- Reverse Osmosis, Residential
- Reverse Osmosis, Commercial
- Shower Filters
- Specialty Filters
- Ultraviolet Systems
- Undersink Filters
- Water Softeners
- Whole House Filters
Cartridges
Parts
- Replacement Parts
- Faucets
- Filter Media
- Fittings
- Housings
- O-rings
- Pumps
- Pura UV
- R.O. Parts
- R.O. Tanks
- R.O. Booster Pump
- VIQUA UV