Installing a Saddle Inlet Valve
This highly effective valve installs with a single tool, a 3/8" wrench or a small adjustable wrench. The valve is for installation on copper pipe only and is designed for small undersink pipe. The most common faucet riser size is 3/8" but the valve will adapt to pipes up to 1/2".
Note: If you use the Quick Connect tube connector provided in the kit, which we recommend, you'll have some small parts left over. If you prefer to make an old-fashioned compression fitting to connect the 1/4" tube to the saddle valve, you have everything you need. Follow the instructions on the saddle valve package.

The inline John Guest valve, which is preinstalled in the tubing, is redundant, since the saddle valve itself can be used as an on/off valve. We highly recommend, however, that once the saddle valve is installed, you turn the unit off and on with the inline John Guest valve. Leave the saddle valve on at all times for best results.
-
Locate the cold water riser (pipe) and turn off the undersink valve.
-
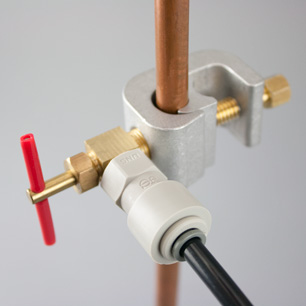
Be sure that the red handle is completely open (counterclockwise), then position the saddle valve in a convenient place on the pipe. Avoid possible hazards like sprayer hoses and misshapen piping. Try to install in an area of easy access and point the threaded outlet toward the unit you are going to supply water to.
-
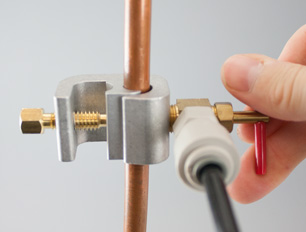
Place the small spacing wedge appropriately on the pipe. The small side goes toward the pipe with 3/8" piping, and the larger side goes toward a larger pipe. Position the valve around the pipe as shown. Note that the screw is against the wedge, not against the pipe.
-
Tighten the screw until the valve is securely attached to the pipe. Use a wrench, but do not tighten to the point where the pipe is bent or misshapen.
-
When the unit is installed securely and ready for service, screw the quick connect tube connector onto the saddle valve. Hand tight is usually good enough, and no Teflon tape is needed. Do not overtighten.
When the quick connect fitting is installed, insert the end of the inlet tubing that is nearest the inline valve into the quick connect fitting. Just push it in until it hits bottom and it will lock in place. Trim the other end of the tube to the needed length. Be sure to get a square, even cut. Then, insert the open end of the inlet tube into your water filtration unit.
When the valve is installed, open the cold water sink faucet, turn on the undersink valve that controls the faucet riser, and allow water to run into the sink. Also lock the ledge faucet for your water filtration unit in the open position.
-
 Puncture the pipe by turning the red handle.
With cold water running, puncture the pipe by turning the red handle on the inlet valve as far as it will go clockwise. It will come to a stop when it's in all the way. Check for leaks. Next, open the saddle valve by turning the red handle slowly counterclockwise as far as it will go. Water will begin to flow into the unit. Check for leaks.
-
If all is well, close the sink faucet & let the drinking water unit go through its break-in.
Note: Should the valve leak around the stem on start-up, the problem can usually be corrected by tightening the 3/8" nut immediately below the red handle.
Site Index
Filtration Systems
- Aeration for Iron & Sulfide
- Backwashing Filters
(whole house & well units)
- Chlorine & Chemical Injectors
- Countertop Water Filters
- Emergency Filters
- Garden Hose Filters
- Reverse Osmosis, Residential
- Reverse Osmosis, Commercial
- Shower Filters
- Specialty Filters
- Ultraviolet Systems
- Undersink Filters
- Water Softeners
- Whole House Filters
Cartridges
Parts
- Replacement Parts
- Faucets
- Filter Media
- Fittings
- Housings
- O-rings
- Pumps
- Pura UV
- R.O. Parts
- R.O. Tanks
- R.O. Booster Pump
- VIQUA UV